How to Insert Images in HTML PowerPoint Slides: Complete Guide (2026)
Two ways to insert images in HTML presentation slides without writing code: outline-stage image placement and post-render editor insertion in Tosea.ai, plus the standard developer methods explained.

HTML presentations are having a moment. In AI and developer communities, the shift toward HTML-based slides has accelerated significantly — and for good reason. An HTML slideshow runs in any browser without installing software, supports smooth animations natively, and can be shared as a single file that anyone can open on any device. Unlike a traditional PowerPoint file, an HTML presentation does not degrade across platforms or lose formatting when emailed.
But for anyone without a coding background, creating an HTML presentation comes with a real obstacle: how do you insert images?
In traditional software, inserting an image is two clicks. In HTML slides, the conventional approach involves writing code, managing file paths, bundling images with the HTML file in a compressed archive, and debugging when the path references break. That is a significant technical barrier for most professionals.
This guide covers both approaches — the standard HTML method for developers who want to understand how it works, and the no-code Tosea.ai method that handles image insertion without writing a single line of code. For the broader trade-off between HTML and image-first slide generation, see our companion piece on AI slides: HTML vs image generation.
Before you start: Tosea.ai integrates leading AI models including Gemini and Claude to generate professional HTML presentations directly from your documents. Register at tosea.ai now and follow along.
Why HTML Presentations Are Replacing Traditional Slides
The trend toward HTML slides is not just aesthetic. There are practical reasons why developers and AI-forward teams prefer the format.
HTML slides run natively in any browser without requiring PowerPoint, Keynote, or Google Slides. According to MDN Web Docs' overview of web presentations, HTML is the universal rendering layer for modern content — meaning an HTML slide deck will look identical on Windows, macOS, Linux, iOS, and Android without conversion.
Animations in HTML presentations use CSS and JavaScript natively, which means they are smoother and more customizable than the animation engines in traditional presentation software. Libraries like Reveal.js, which powers many HTML presentation tools, offer transition effects, nested slides, speaker notes, and PDF export out of the box.
HTML presentations are also version-controllable. A developer can track changes to a slide deck in git, branch it, review diffs, and merge updates — workflows that are impossible with binary file formats like .pptx.
The challenge is that all of these benefits assume you can write HTML, CSS, and JavaScript. For the majority of professionals, that is not a realistic expectation. The image-insertion step in particular is where most non-developers stall: it is the most common content task in a deck, and it is the one most exposed to the file-path management that makes HTML brittle.
The Standard HTML Method: How Image Insertion Actually Works
Understanding the technical approach helps explain why no-code tools like Tosea.ai are valuable. Here is how image insertion works in HTML slides at the code level.
Method 1: The HTML img Tag
The most basic approach embeds an image using the <img> element:
<section>
  <h2>Capital Chasing Bankability: Technology Outlook for 2026</h2>
  <img src="images/technology-chart.png" alt="Technology Optimism Chart" width="600">
</section>
The critical requirement is that the src path must correctly reference the image file relative to the HTML file. If the HTML file is at presentation/index.html and the image is at presentation/images/chart.png, the path images/chart.png works. If the file structure changes, the reference breaks and the image disappears.
Method 2: CSS Background Images
For full-bleed background images on slides, CSS background properties are more appropriate than the img tag:
.slide-background {
  background-image: url('images/energy-background.jpg');
  background-size: cover;
  background-position: center;
}
This approach is used in frameworks like Reveal.js for slide-level background images. The same path management requirements apply.
Method 3: Markdown Image Syntax With a Build Step
Many HTML presentation workflows use Markdown as the source format, converting it to HTML through a build tool. In Markdown, image insertion uses this syntax:

This is cleaner than raw HTML, but it adds a build step — the Markdown must be processed into HTML by a tool like Pandoc or a presentation-specific converter. The image files still need to be packaged alongside the HTML output.
Method 4: Create a Picture Slider Using HTML and CSS
For multi-image presentations or image carousels within a slide, a basic HTML image slider requires both HTML structure and CSS animation:
<div class="slideshow-container">
  <div class="slide fade">
    <img src="images/slide1.png" style="width:100%">
  </div>
  <div class="slide fade">
    <img src="images/slide2.png" style="width:100%">
  </div>
</div>
.fade {
  animation-name: fade;
  animation-duration: 1.5s;
}
@keyframes fade {
  from {opacity: .4}
  to {opacity: 1}
}
W3Schools' HTML slideshow tutorial provides a complete working example of this pattern, including the JavaScript required for navigation. This is a standard slideshow HTML code pattern used across the web.
Method 5: Base64 Inline Embedding (the "no separate file" workaround)
Some teams avoid file-path management by inlining the image directly as a base64 string:
<img src="data:image/png;base64,iVBORw0KGgoAAAANSUhEUgAA..." alt="chart">
This embeds the image bytes inside the HTML file itself, producing a single self-contained file that survives moves and emails. The trade-offs are real: HTML file size grows by roughly 33% over the raw image bytes, build tools must base64-encode every image, and the resulting markup is unreadable. For a 10-slide deck with high-resolution figures, the HTML file can balloon past 20 MB. The approach works for a one-off deck and is unworkable for a recurring weekly or quarterly cadence.
The Core Problem With All These Methods
Every standard HTML approach shares the same fundamental challenge: image files must be managed as separate assets alongside the HTML file (or laboriously inlined), and any mismatch between the file path in the code and the actual location of the image file breaks the presentation.
For professionals without coding backgrounds, this is not a minor inconvenience — it is a complete blocker. And this is exactly the problem that Tosea.ai was designed to solve.
The Tosea.ai Method: No-Code Image Insertion in HTML Presentations
Tosea.ai is an AI presentation tool that integrates multiple leading models — including Gemini and Claude — to generate professional HTML slide decks directly from uploaded documents. The generated presentations include clean, minimal HTML templates that look professional without any design work.
The image insertion workflow in Tosea.ai requires no HTML knowledge and no file management. There are two distinct methods depending on where you are in the presentation creation process.
Method 1: Insert Images During the Outline Stage
The most efficient approach is to add images before the final HTML render is produced. After uploading your document, Tosea.ai generates an outline and content structure for the presentation. At this stage, you can insert images directly into the slide content.
The interface allows you to specify which image belongs with which slide content, add captions, and confirm the placement — all before the HTML is generated. When you click to render the final presentation, the images are embedded directly in the output with correct path references handled automatically.

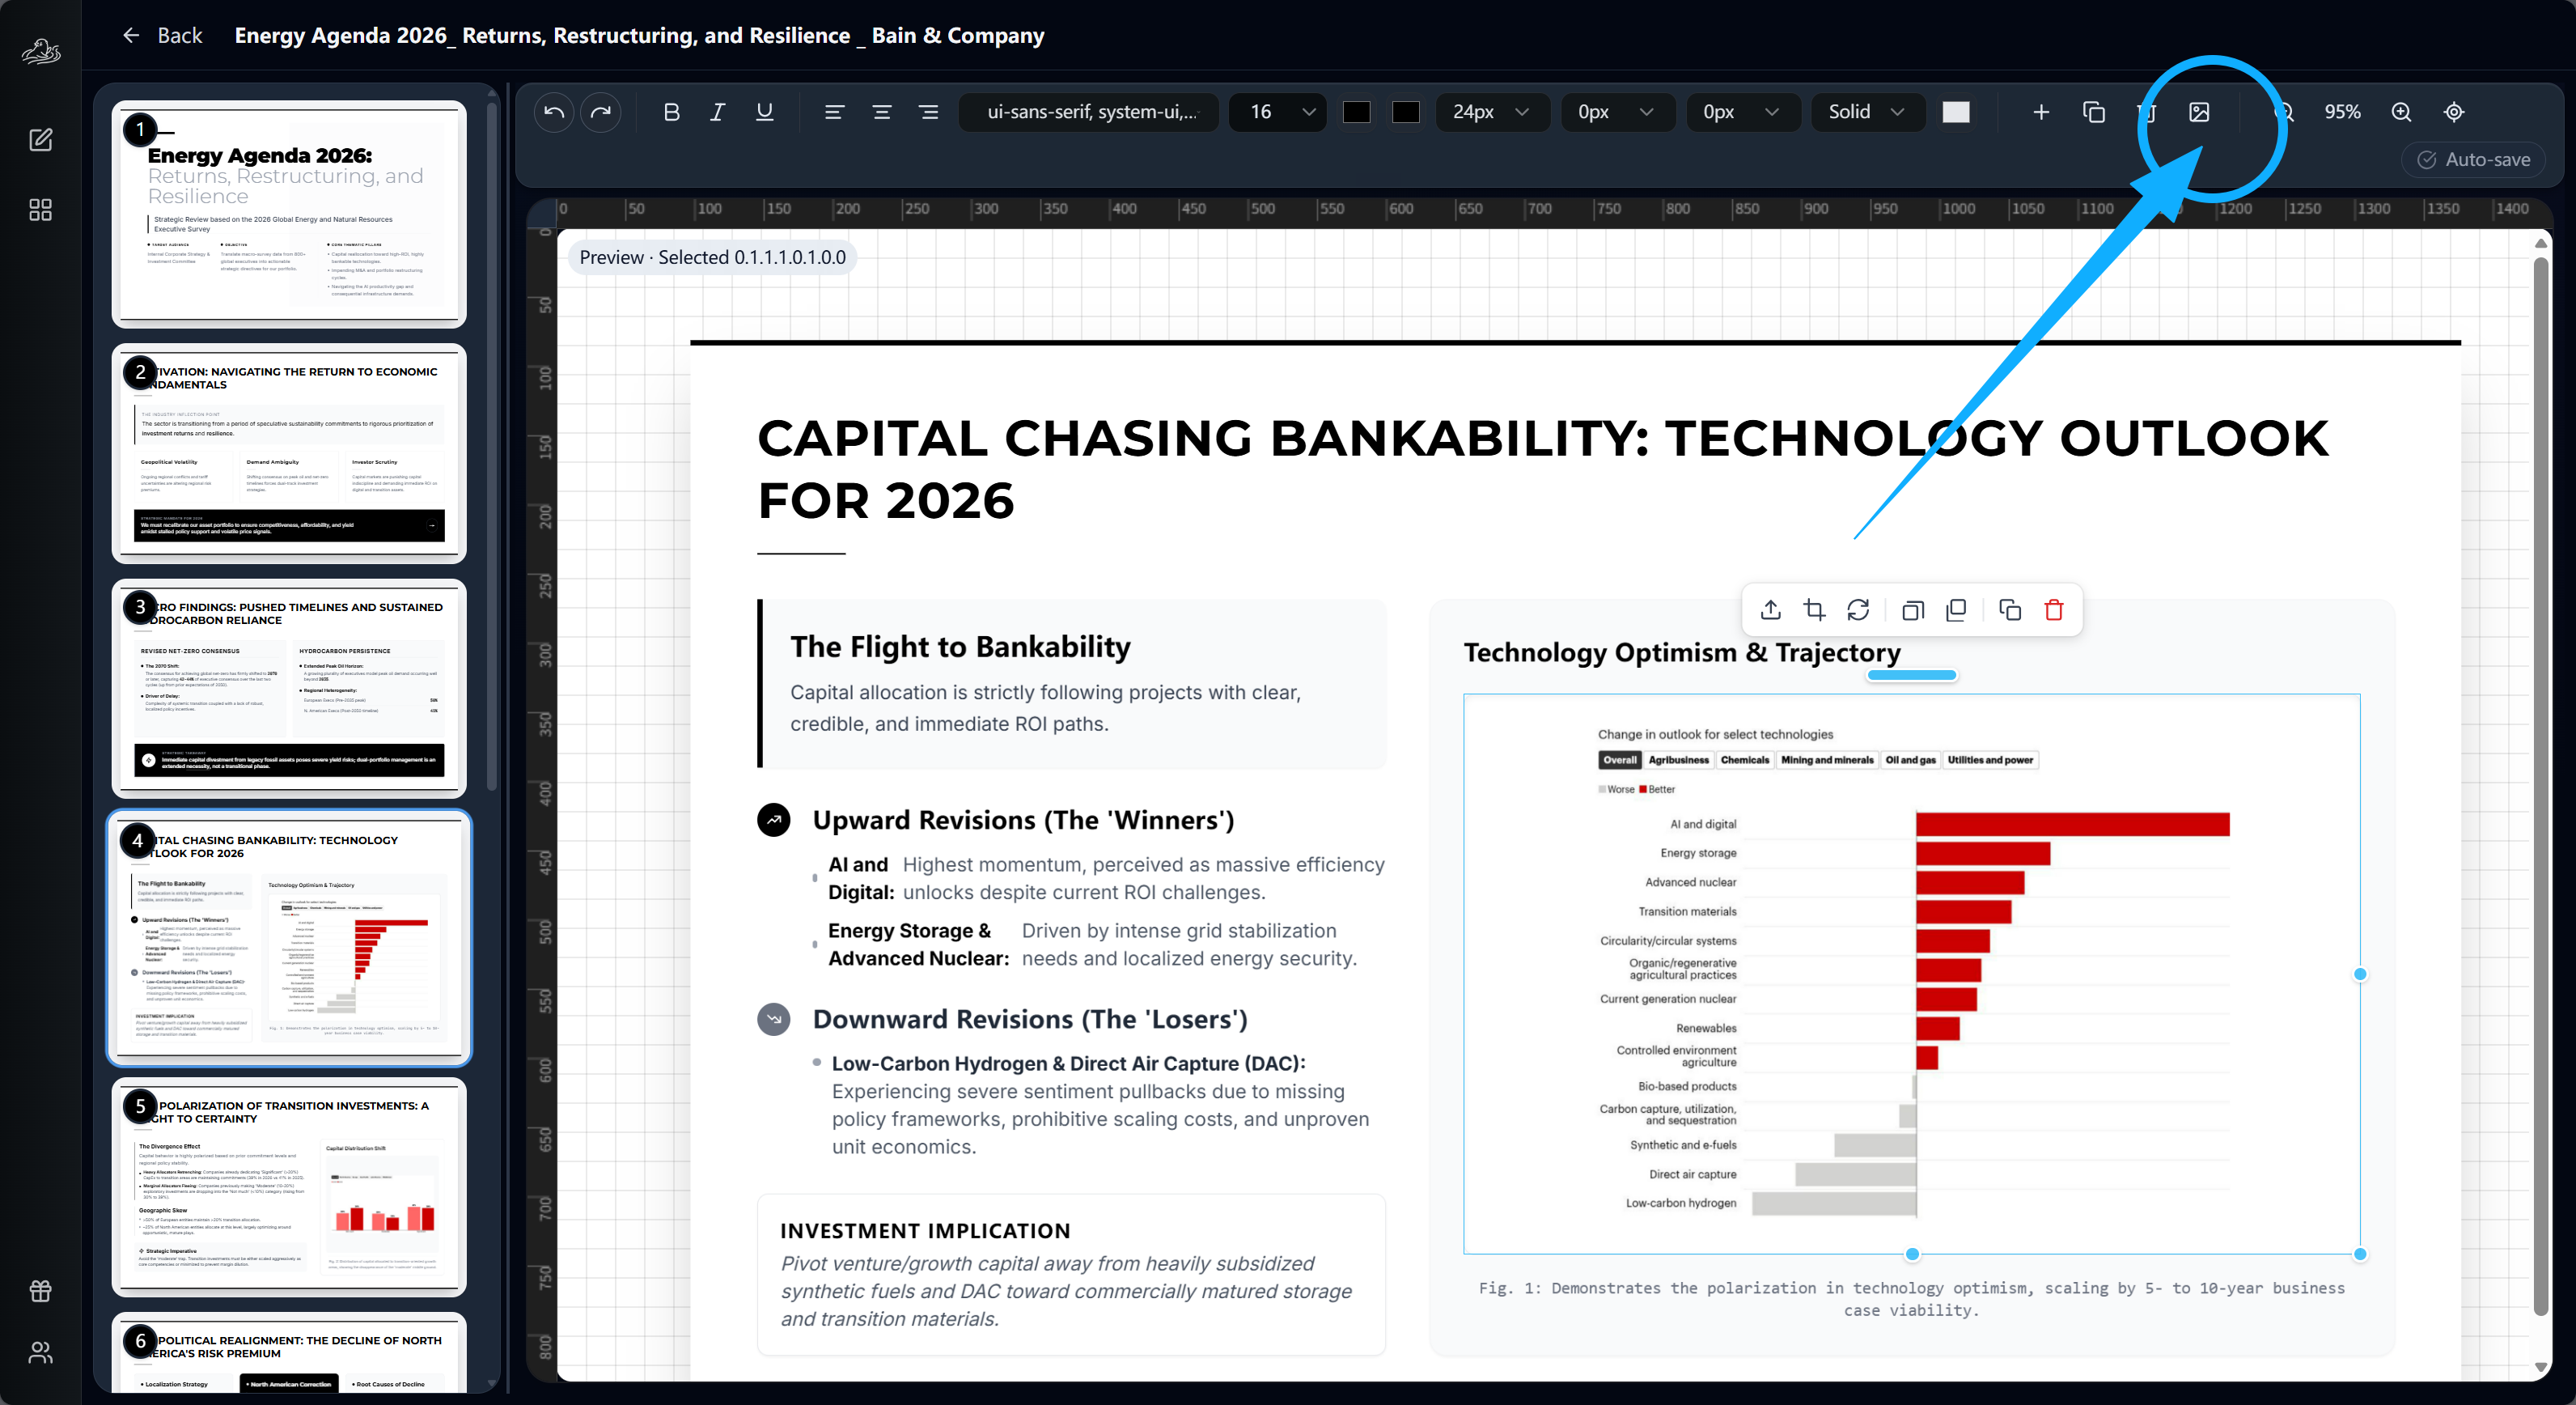
This approach is particularly useful when you know exactly which figures, charts, or photographs belong with which sections of your presentation. The Bain and Company Energy Agenda 2026 report example shown above demonstrates this workflow: the AI has generated structured slide content including investment implications and technology outlook analysis, and the figure from the original report is being matched to the corresponding slide before the final HTML render is produced.
The key advantage of inserting images at the outline stage is that you can review the complete content structure and image placement together before committing to the final render. If a figure needs to move to a different slide, it is a simple repositioning rather than a post-render edit. This pattern also matches the practice we recommend in our zero-hallucination AI slides guide — pinning figures to outline points before render is what keeps every chart traceable to its source paragraph.
Method 2: Insert Images After the HTML Presentation Is Rendered
If you want to add or replace images after the full HTML presentation has been generated, Tosea.ai's built-in editor handles this without requiring any code editing.
After the presentation is rendered, click the Edit button to open the slide editor. Each slide can be selected individually. In the editor, navigate to the upper right corner of the editing interface and click the image insertion icon — the icon that resembles a picture frame, circled in the interface screenshots below.
Clicking this icon opens a dropdown with three options:
Upload New — Upload an image file directly from your computer. Tosea.ai handles the embedding automatically, so you never need to manage file paths or bundle assets manually.
Select Existing — If you have already uploaded images during the current session (for example, images added during the outline stage), you can select from previously uploaded files without re-uploading.
AI Generate — Request an AI-generated image for the current slide. The AI creates an image based on the slide content and your specifications.
After selecting or uploading the image, you can add a caption using the Caption field shown in the interface. The caption appears below the image in the rendered slide, following standard academic and professional figure labeling conventions — as shown in the Energy Agenda example, where the figure caption reads: Fig. 1: Demonstrates the polarization in technology optimism, scaling by 5- to 10-year business case viability.
The entire process — from clicking the image icon to seeing the image placed in the slide — takes under 30 seconds. No HTML editing, no file path management, no compression required.
When to Use Each Method
The two methods cover different stages of the editing flow, and picking the right one saves rework:
- Use outline-stage insertion when you already have the source figures. Examples: you uploaded a research paper PDF and want every figure pinned to the slide that discusses it; you have a folder of charts from your BI tool that map to specific KPIs; you are converting a Bain or McKinsey report that contains pre-formatted exhibits. Outline-stage placement preserves the figure-to-text link end-to-end.
- Use the post-render editor when the source figures change mid-flow. Examples: marketing approves a new product screenshot the day before the deck is due; an analyst rerun produces a corrected chart; a stakeholder asks you to swap a stock photo for the team headshot. The editor is also where AI Generate fits — when no source image exists and you need a clean illustration that matches the slide content.
A useful rule of thumb: build the deck once at the outline stage with whatever figures you have, then use the editor for the inevitable last-minute swap. This avoids the failure mode of editing every slide twice.
Common Image-Insertion Pitfalls (and How Tosea Handles Each)
Most "my image won't show up" problems in HTML slides reduce to one of five root causes. Each is something Tosea handles for you, but it is worth understanding what is happening underneath:
- Relative-path drift. The
src="images/chart.png"reference works in your IDE preview but breaks when the HTML moves to a shared drive. Tosea inlines or bundles assets at render time, so the deck is portable by default. - Image too large for the slide. A 4K screenshot rendered at 100% width slows the browser and clips below the fold. The Tosea editor downsamples and reflows the figure to fit the slide template's image region.
- Wrong color profile. sRGB vs Display P3 images can look washed out on projectors. Tosea normalizes to sRGB on export, matching the same convention PowerPoint uses.
- Missing alt text. Critical for accessibility audits and search indexing of public-shared decks. The caption field doubles as alt text on export.
- Lost caption on PPTX conversion. When converting HTML to .pptx, naive converters drop the
<figcaption>element. Tosea's converter preserves the caption as a text box anchored to the figure, so the meaning travels with the slide.
If you have ever spent an afternoon debugging a missing image right before a presentation, you know this list is not theoretical — it is the actual taxonomy of failure modes in HTML decks.
Exporting Your HTML Presentation
Once you are satisfied with the slide content and images, export the presentation as HTML from the upper right corner of the Tosea.ai interface.
The exported HTML file is a self-contained document that can be opened in any web browser. Animations, transitions, and slide navigation all function in the browser without any additional software. The presentation can be shared by sending the HTML file directly, hosting it on any web server, or uploading it to a file sharing service.
To play the presentation, open the HTML file in Chrome, Firefox, Safari, or Edge. The presentation interface loads immediately, with slide navigation through arrow keys or on-screen controls. All animations that were part of the template play as intended.
This is the key advantage of the HTML format over a PowerPoint or PDF export: the interactive experience — transitions, animated elements, and speaker view — is preserved exactly as designed, across every device and operating system. If you later need a .pptx for a venue that requires PowerPoint, Tosea also exports to native PowerPoint format — covered in our PDF to PowerPoint slides guide.
Tosea.ai Versus the Standard HTML Approach: A Direct Comparison
For professionals deciding between writing HTML slides manually and using Tosea.ai, the practical differences are significant:
| Dimension | Standard HTML approach | Tosea.ai |
|---|---|---|
| Image insertion time | 5–15 min per image (path setup + debug) | Under 30 seconds |
| Path management | Manual, relative paths | Automatic |
| Asset bundling | Manual zip / base64 encoding | Built-in self-contained export |
| Caption / alt text | Hand-written per image | Inline field with auto alt text |
| Reordering a figure | Edit HTML + reference path | Drag-and-drop |
| Format conversion | Custom build pipeline | HTML and .pptx export |
| Skill required | HTML, CSS, JS | None |
The standard HTML approach requires writing and maintaining code, managing image files separately, debugging path references, and understanding the build process of whichever HTML presentation framework you choose. Even with a framework like Reveal.js, the learning curve is substantial for non-developers.
Tosea.ai requires uploading your document and clicking. Image insertion is a visual, point-and-click process. The AI models — Gemini, Claude, and others integrated into the platform — handle the content generation, slide structuring, and HTML output. You make creative and editorial decisions. The tool handles the technical execution.
For developers who want full control over the HTML output, the standard approach is the right choice. For the majority of professionals who need polished HTML slides without writing code, Tosea.ai provides a significantly faster and less error-prone path to the same result. Our beyond the template guide goes deeper on this trade-off in the broader AI-slide-generation space.
Get Started With HTML Presentations on Tosea.ai
HTML slides are no longer just for developers. With Tosea.ai, anyone can generate, edit, and export professional HTML presentations — complete with images, animations, and consulting-grade design — without writing a single line of code.
Upload your document, generate your presentation, insert your images using either the outline-stage or post-render method, and export your HTML file ready to play in any browser.
Register at tosea.ai today and create your first professional HTML presentation in minutes.


